

Accessing the app
Log into your PEX account to finalize the set up.1
Log in to http://dashboard.pexcard.com/
2
Navigate to Apps > Available
3
Scroll to locate PEX Connector for QuickBooks Online.
4
Click More info > Install > Launch.
Select your use case(s)
There are currently two options for how you can connect PEX with QuickBooks Online. We recommend as many as possible to make your reconciliation experience seamless.- Create vendor cards from my QuickBooks vendors.
- Sync transactions from PEX to QuickBooks nightly.
1
Click Create vendor cards from my QuickBooks vendors to open the Sync vendors to PEX wizard.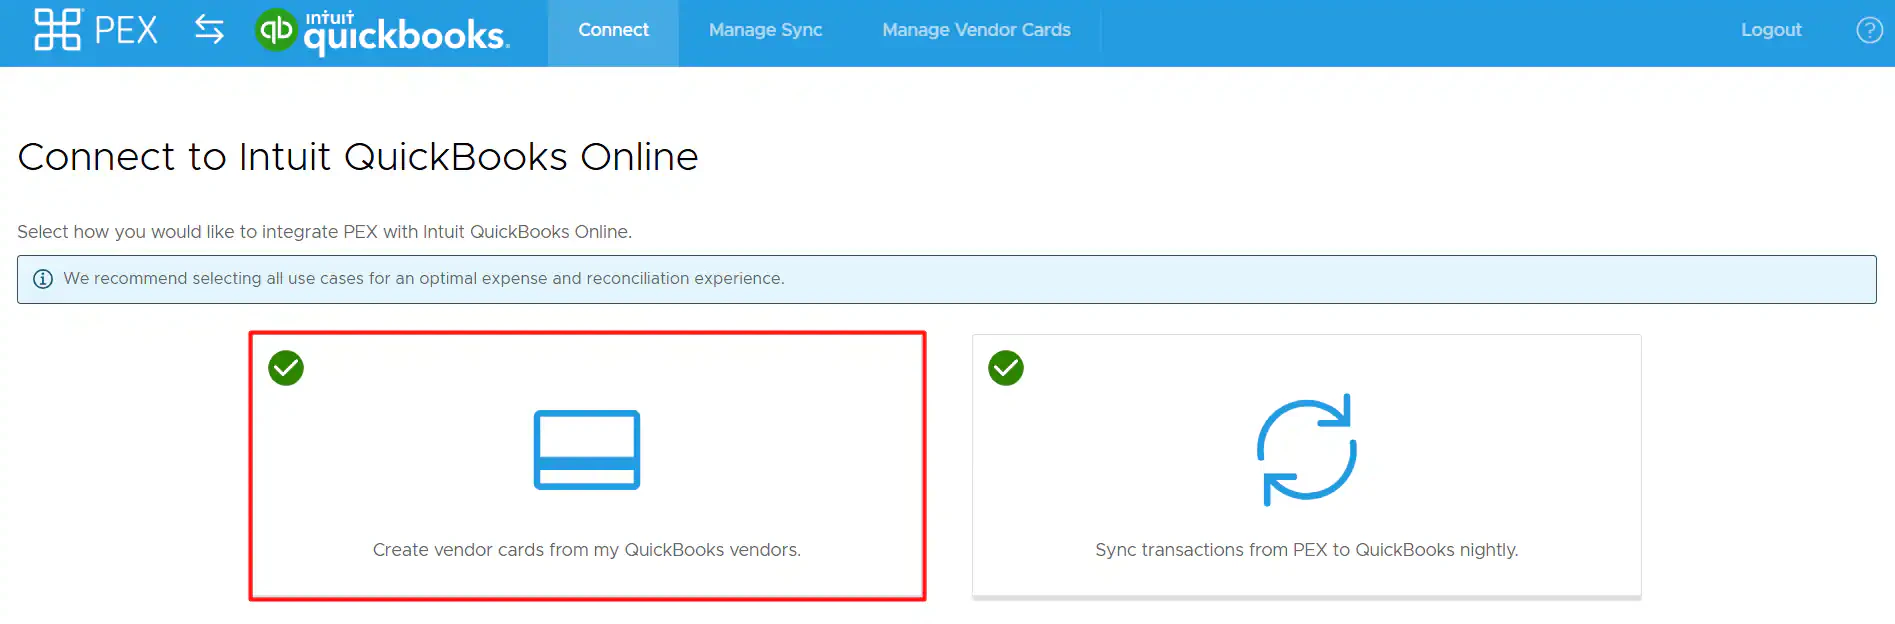
2
Click the green button to connect to your QuickBooks Online account if you are not already connected.
Step 1 — Select vendors
1
You will see a dual-panel picker: your QuickBooks vendors on the left under All and your picks on the right under Selected. Each row shows the vendor name and its QuickBooks spend so you have context while you choose.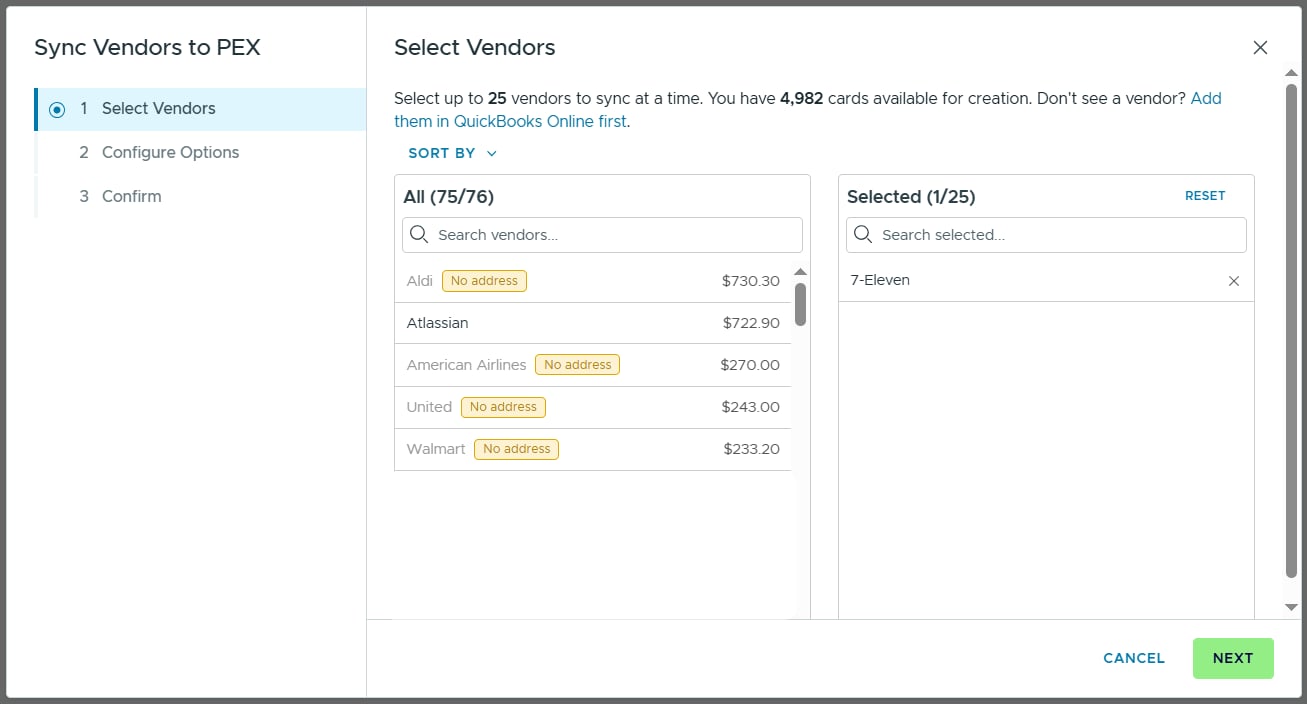
Note:PEX imports only active vendors.
2
Sort the list A to Z, Z to A or by spend, and use the search box to filter by vendor name.
3
Click a vendor row to select it. Selected vendors move to the Selected panel.
Note:You can sync up to 25 vendors at a time.
4
A vendor with no address in QuickBooks shows a No address label and is grayed out so you cannot select it. Hover over the row and you will see: Address is required. Add an address in QuickBooks and refresh this page. Add the address in QuickBooks Online, then refresh the wizard.
5
If a vendor is missing from the list, add them in QuickBooks Online first. See Add a vendor in QuickBooks Online. After you add them, the name is searchable in PEX.
6
To start over, click Reset. It appears once you select at least one vendor.
7
Click Next. If you have not selected a vendor, PEX shows Select at least one vendor.
Step 2 — Configure options
1
On the Configure how your vendors are used screen you will see every vendor you selected. Each vendor is created in PEX with a linked vendor card for payments, so here you set the funding for those cards. An info banner shows how much you have available for funding.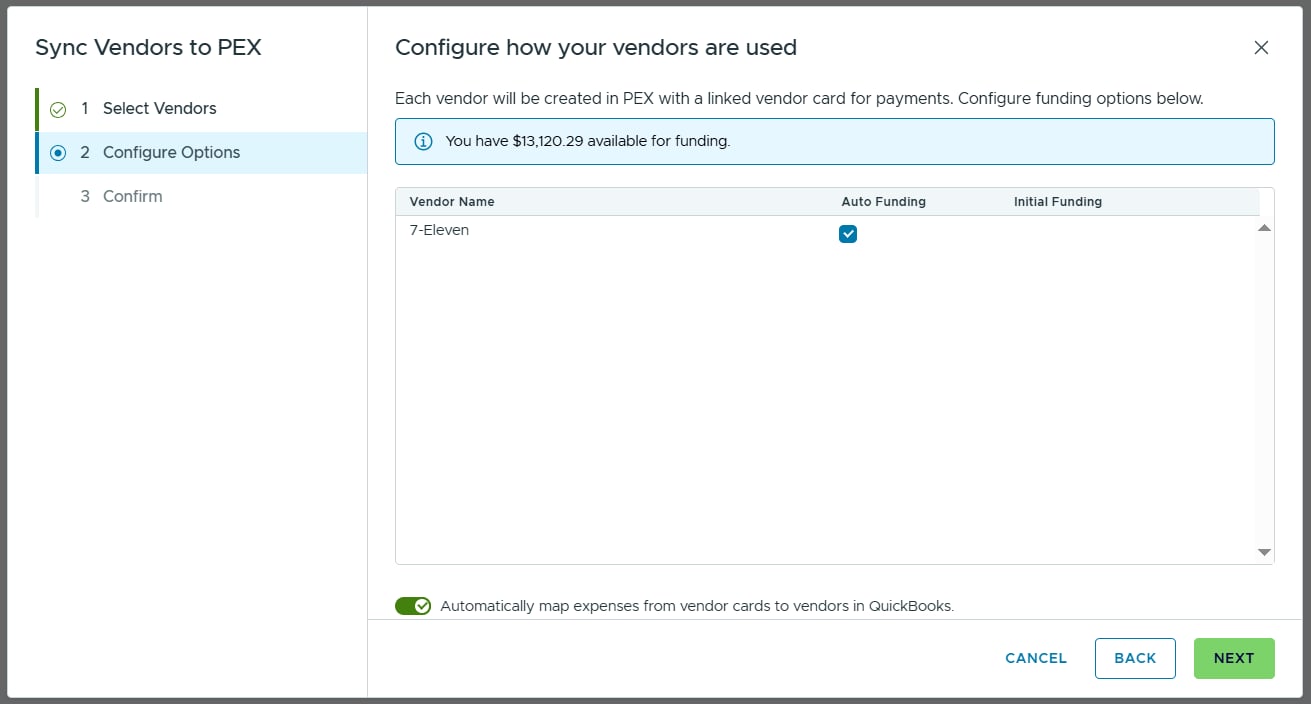
2
Set funding per vendor:
- Prepaid: turn on Auto Funding to fund the card from your PEX Business Balance, or add an Initial Funding amount for that vendor card.
- Credit: set the Card Limit for each vendor card.
3
Use the Automatically map expenses from vendor cards to vendors in QuickBooks toggle at the bottom. It is on by default.
4
When the toggle is on, spending on each vendor’s card maps back to the matching QuickBooks vendor for reporting. When it is off, PEX books all your PEX purchases against a single vendor.
5
Click Next.
Step 3 — Confirm
1
On the Confirm syncing vendors to PEX screen, a banner reminds you what happens for each vendor. PEX will: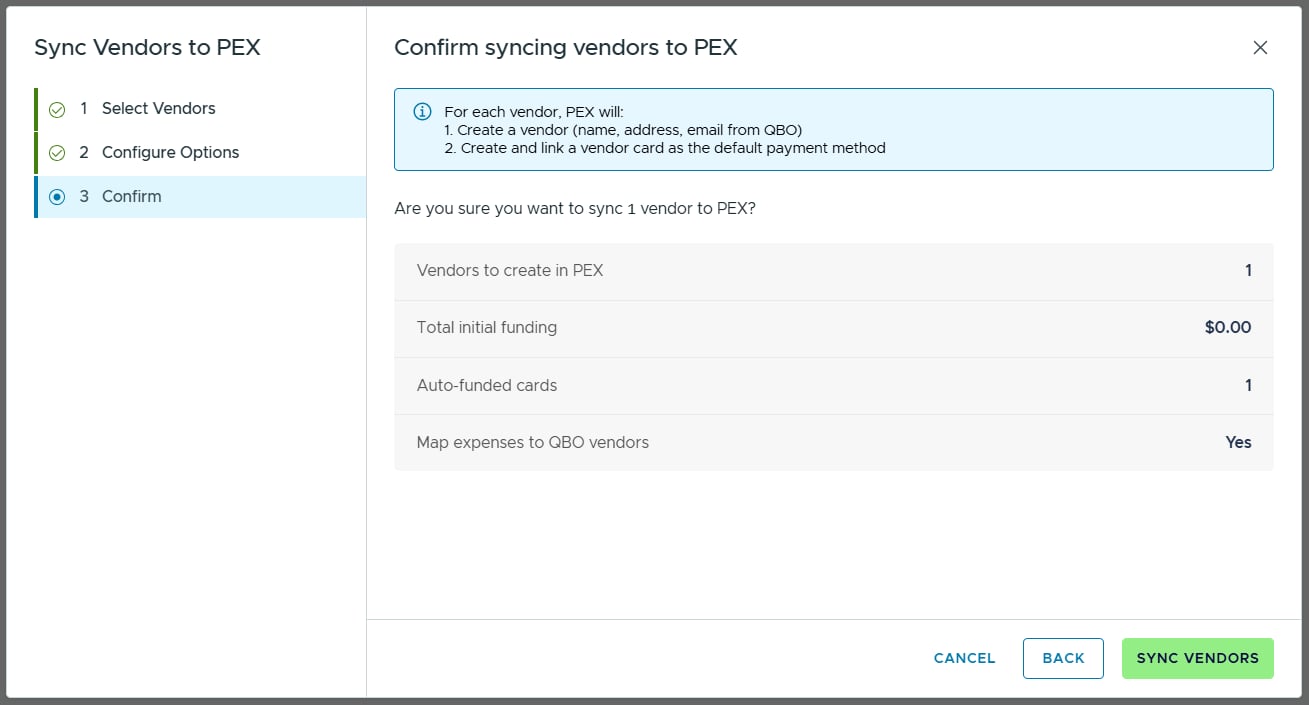
- Create a vendor with the name, address and email from QuickBooks.
- Create and link a vendor card as the default payment method.
2
Review the summary table, then click Sync vendors to confirm. Use Back to change funding options or Cancel to close the wizard.
Note:Before creating a vendor, PEX checks whether that QuickBooks vendor already exists in PEX (by QuickBooks vendor ID first, then by name). If it already exists, PEX skips it so you never get a duplicate. This is why the wizard works cleanly alongside bill sync: vendors you sync here are recognized when unpaid bills sync in.
3
If a vendor name in QuickBooks is longer than 15 characters, the vendor card name in PEX is truncated to 15 characters. The vendor record keeps the full name.
Managing vendors
1
After you sync, PEX opens the Manage vendors tab, where you can view the PEX vendors created from your QuickBooks vendor list. All vendor cards are activated on creation and can be used immediately.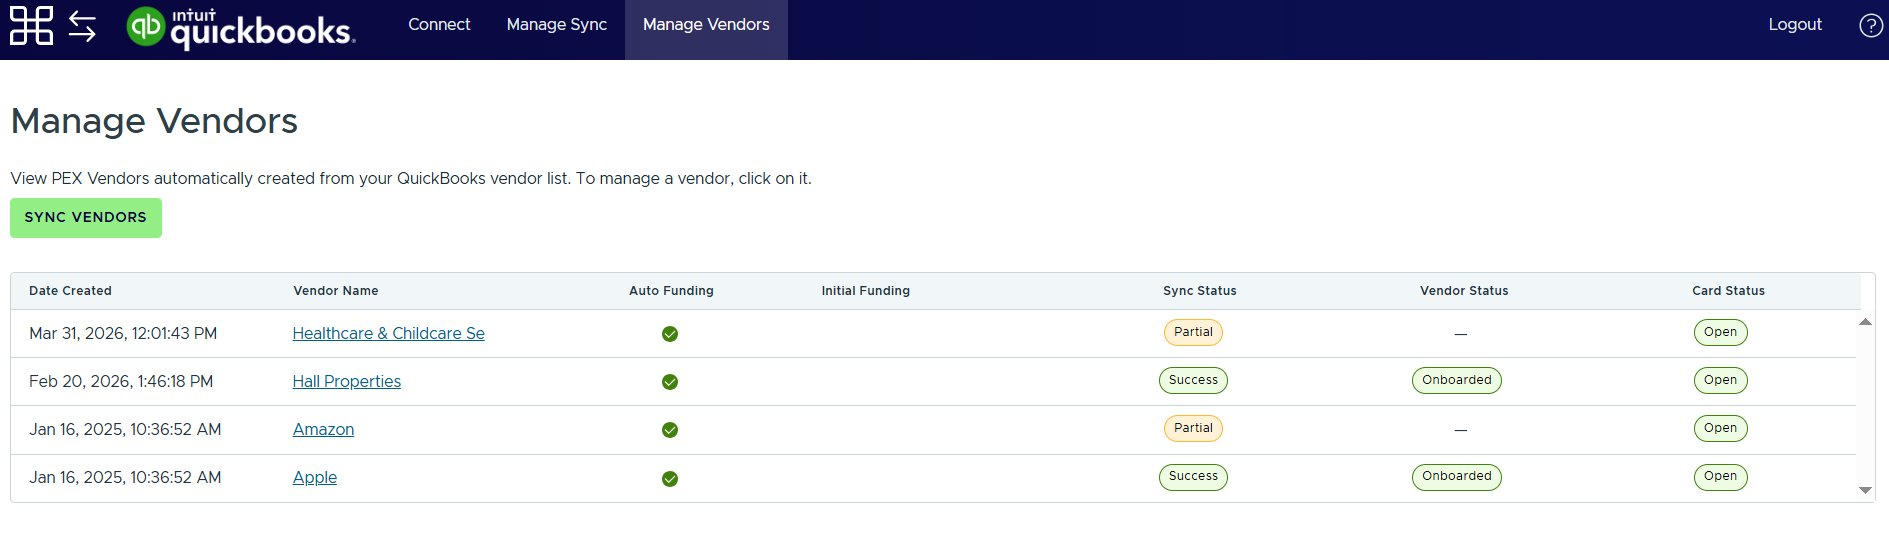
2
Click a vendor name to open the vendor detail page in your Dashboard’s Vendors section.
3
The table shows the sync and status of each vendor:
- Prepaid: Date Created, Vendor Name, Auto Funding, Initial Funding, Sync Status, Vendor Status (Draft, Pending, Onboarded, Closed) and Card Status (Open, Closed).
- Credit: Date Created, Vendor Name, Card Limit, Sync Status, Vendor Status (Draft, Pending, Onboarded, Closed) and Card Status (Open, Closed).
4
If you have not synced any vendors yet, you will see No vendors synced yet. Click SYNC VENDORS to get started.