

Before you start
- Both accounts must be prepaid accounts. Credit Expense accounts can’t send or receive these transfers, and they don’t appear in the From or To lists.
- The accounts must be linked accounts within your organization. See Linked Accounts and Sub-accounts on All Programs. If you don’t yet have a second account, contact Administrator Support or your Customer Success Representative.
- You must be an administrator on both accounts — the sending account and the receiving account. If you’re only an admin on one of them, the other account won’t appear in the “To” list.
- Your administrator profile must have the “Request/delete ACH transfer” permission enabled on the account you start from. This permission controls the Make a Transfer page, so without it the button and page are not available to you.
- The sending account must have enough available balance. Transfers that would drop the sending account below its minimum balance requirement are rejected.
Permissions: Primary administrators have all permissions by default. Other administrators need “Request/delete ACH transfer” turned on under their profile in Team Members > (select admin) > Permissions. The permission description reads: Create, approve, or delete ACH transfers; schedule and modify scheduled transfers.
How to transfer funds between two PEX accounts
1
Log in to the PEX dashboard. You can start from either account — these steps use the account you’re sending funds from.
2
Click Transactions in the left navigation.
3
Click Make a Transfer (blue button in the upper right).
4
In the From field, select the PEX account the funds should come out of.
5
In the To field, select the PEX account that should receive the funds. Your other PEX accounts appear under the Linked accounts heading in the dropdown — external bank accounts are listed separately above them under External accounts. Only accounts you administer appear here, and each one shows its current balance.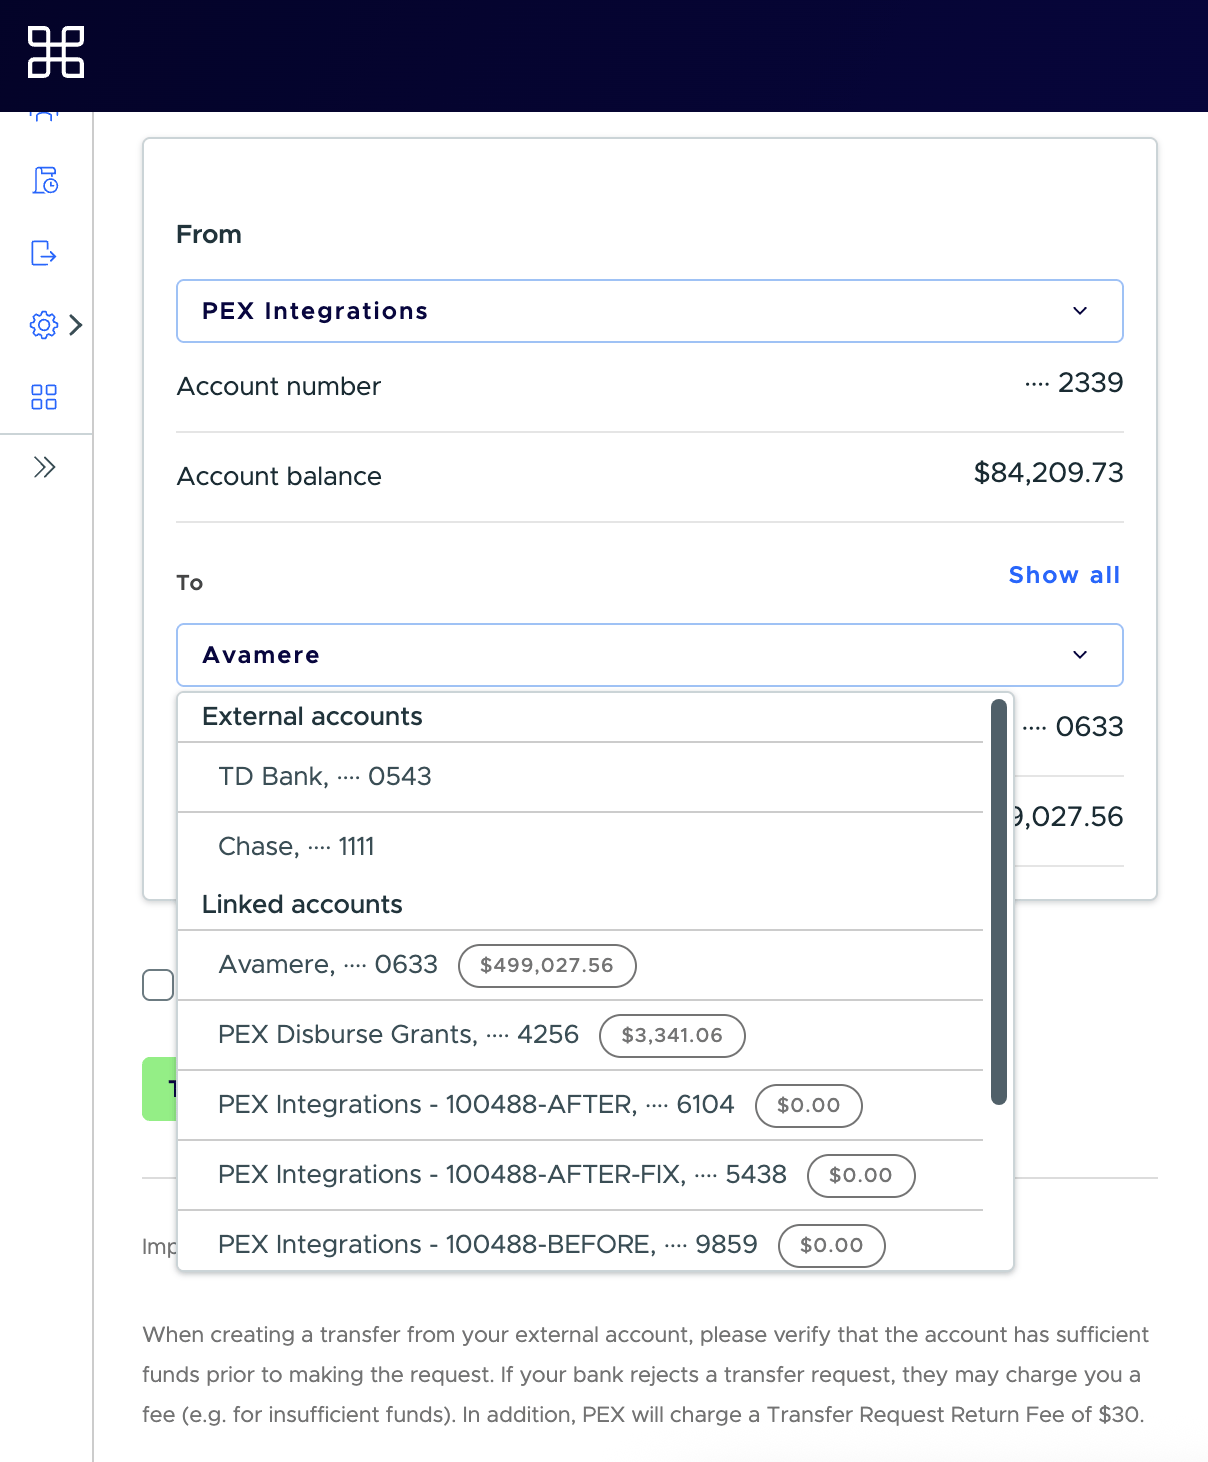
6
Enter the amount in Amount to transfer.
7
Click Transfer, then review the details and click Confirm.
8
You’ll see a “Transfer completed” confirmation, and the funds are available in the receiving account right away.
Note:You can run the transfer from either side. If you’re logged in to the account that’s receiving the funds, pick the other PEX account in the From field — your current account will then be the only choice in To.
Scheduling a recurring transfer between PEX accounts
You can make an account-to-account transfer recurring:1
On the Make a Transfer page, select the From and To PEX accounts and enter an amount.
2
Check Make this a scheduled transfer.
3
Choose how often the transfer should run — on the 1st of the month, or on a specific day of the week.
4
Click Transfer and confirm. The transfer appears on the Scheduled Transfers page, where you can edit or delete it later.
Where to see the transfer
Completed account-to-account transfers appear under Transactions > Business Transfers for both accounts. Scheduled ones appear under Transactions > Scheduled Transfers.Troubleshooting
Can I transfer funds to or from a Credit Expense account?
Can I transfer funds to or from a Credit Expense account?
No. Account-to-account transfers apply to prepaid accounts only. A Credit Expense account has a line of credit rather than a funded balance, so it can’t send or receive a transfer and won’t appear in the From or To lists.
The other PEX account doesn't appear in the 'To' list
The other PEX account doesn't appear in the 'To' list
The account is a Credit Expense account, the accounts are not linked or you are not an administrator on the other account. Confirm the link under Business Settings > Linked accounts, and have an admin add you to the other account.
'Invalid request. Businesses are linked incorrectly or admin doesn't have required permissions.'
'Invalid request. Businesses are linked incorrectly or admin doesn't have required permissions.'
The two accounts aren’t linked in a way that permits transfers, or your administrator profile is missing the “Request/delete ACH transfer” permission. Contact Administrator Support if the link looks correct.
'Insufficient funds' or 'This transfer would violate the minimum balance limit on the account.'
'Insufficient funds' or 'This transfer would violate the minimum balance limit on the account.'
The sending account doesn’t have enough available balance, or the transfer would take it below the minimum balance configured for the account. Fund the sending account first, or lower the transfer amount.