

Navigate to the Cards page
1
Log in to the Dashboard at dashboard.pexcard.com.
2
Open Cards from the sidebar menu.
3
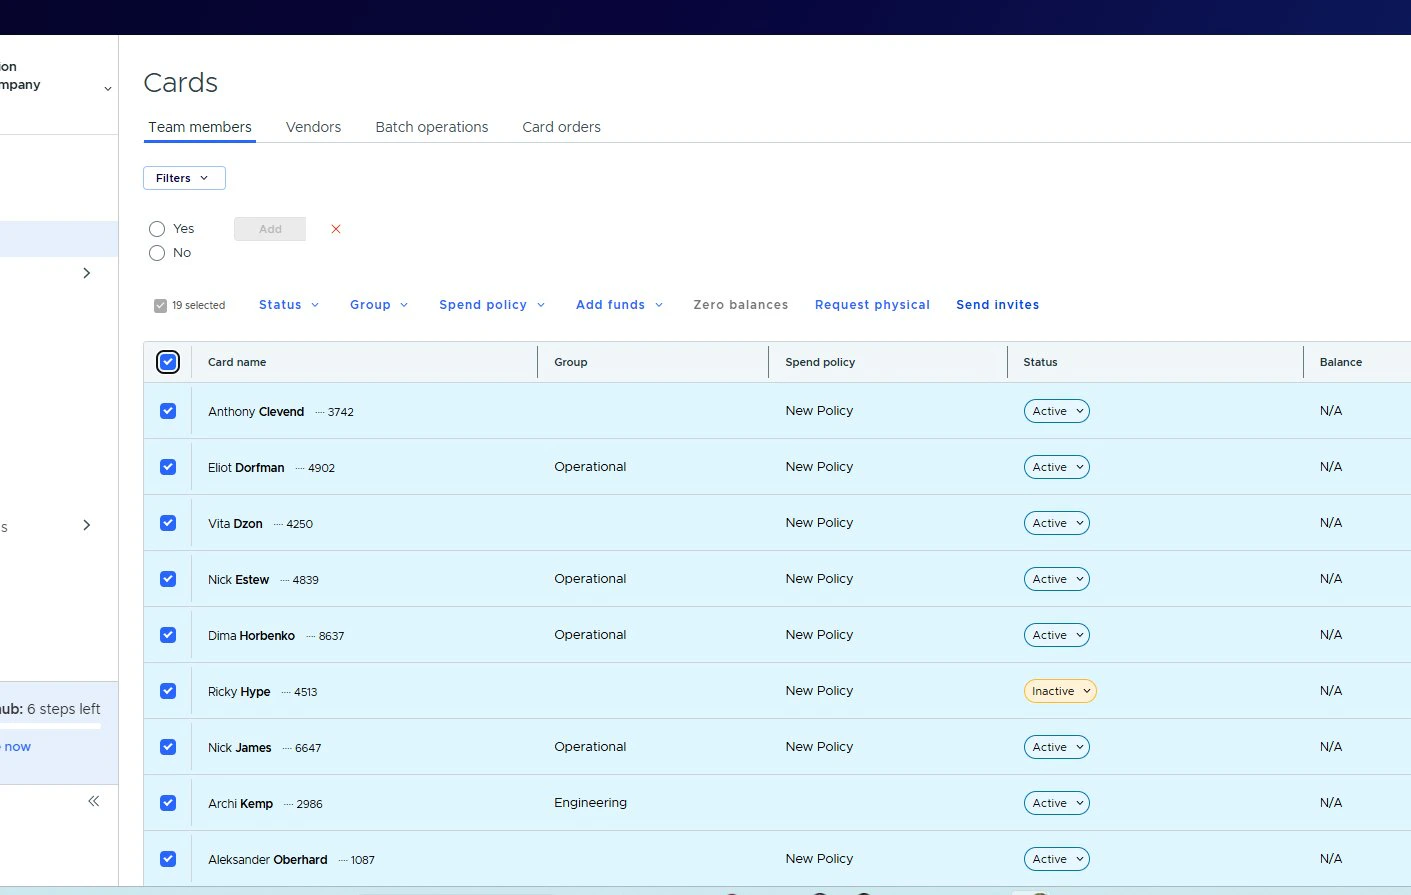
Make sure the Team members tab is selected. You will also see tabs for Vendors, Batch operations, and Card orders.
Filter your cardholders
Click the Filters dropdown at the top-left of the card list to narrow your view. The following filter parameters are available:
Select a filter, set a value, and click Add. You can combine multiple filters to narrow your results. Click the ✕ next to any active filter to remove it.
Tip:Use the Is registered filter to quickly identify cardholders who haven’t activated their accounts yet — useful before sending bulk invite reminders.
Select cards for bulk actions
Once your list is filtered (or unfiltered), select cards to act on:- Click the checkbox next to individual rows to select them one by one.
- Click the header checkbox to select all visible cards at once. A count (e.g., “19 selected”) confirms your selection.
Bulk actions
Bulk actions let you manage multiple cards at once, saving time and ensuring consistency. Here’s what each action does.Change status
Click Status in the action bar to update the status of all selected cards. Choose from:- Active — card is enabled and can be used for transactions
- Blocked — card is temporarily disabled; can be reactivated later
- Closed — card is permanently deactivated (cannot be undone)
Warning:Closing a card is permanent. If you only need to temporarily suspend access, use Blocked instead.
Assign group
Click Group to assign all selected cards to an existing group, remove them from a group, or create a new one. Groups help you organize cardholders by department, project, or cost center.- None — remove the current group assignment
- New group — create a group on the fly and assign selected cards to it
- Existing groups — pick from groups already configured (e.g., Engineering, Operational)
Assign spend policy
Click Spend policy to apply or change the spend policy on all selected cards. Spend policies control transaction limits, merchant category restrictions, and other spending rules.- None — remove the current policy; cards use the account-level default rules
- Create new policy — build a new policy and apply it immediately to selected cards
Add funds
Click Add funds to load money onto all selected cards in a single step. Choose a preset amount or enter a custom value:- Preset amounts: 50, 150, $200
- Custom… — enter any amount
Tip:The Quick fund column on the card list lets you add funds to individual cards without opening the card detail page.
Zero balances and request physical
- Zero balances — set every selected card’s balance to $0.00. Funds are returned to your PEX business account.
- Request physical — request physical cards for selected virtual cardholders.
Send invites
Send registration invites to unregistered cardholders in bulk:1
Select the cardholders you want to invite (or select all).
2
Click Send invites in the action bar.
3
A confirmation dialog appears. Review the message — invites will only be sent to unregistered cardholders. Already-registered cardholders will be counted as “Failed” on the Batch Operations page.
4
Click Send invites to confirm.
Track your batch operations
Every bulk action you trigger is logged on the Batch operations tab at the top of the Cards page. Navigate there to check whether an operation is still in progress, completed successfully, or had any failures. This is especially useful after sending invites, so you can see how many succeeded versus how many were already registered.Best practices
Tip:Filter first, then act. Combine the “Is registered” and “Status” filters before sending invites — this ensures you’re targeting only active, unregistered cardholders and avoids unnecessary failures.
Tip:Use groups strategically. Assign groups by department or project so you can quickly filter and fund the right cards during budget cycles.
Tip:Review Batch operations regularly. After any bulk action, check the Batch operations tab to confirm everything completed as expected.