> ## Documentation Index
> Fetch the complete documentation index at: https://support.pexcard.com/llms.txt
> Use this file to discover all available pages before exploring further.
# Sync QuickBooks Online vendors to PEX
> Sync your QuickBooks Online vendors into PEX as vendors with linked vendor cards ready for bills and payments
**Sync vendors to PEX** turns your QuickBooks Online vendor list into PEX vendors you can pay right away. For each vendor you select, PEX creates a vendor record from your QuickBooks data and links a vendor card as its default payment method in one step. You get a ready-to-use vendor list for bills and payments without re-entering anyone, and you can save 1% on vendor spend with a PEX Vendor Card.
## Accessing the app
Log into your PEX account to finalize the set up.
Log in to [http://dashboard.pexcard.com/](http://dashboard.pexcard.com/?utm_source=support)
Navigate to [Apps > Available](https://dashboard.pexcard.com/apps/available?utm_source=support)
Scroll to locate **PEX Connector for QuickBooks Online**.
Click **More info** > **Install** > **Launch**.
## Select your use case(s)
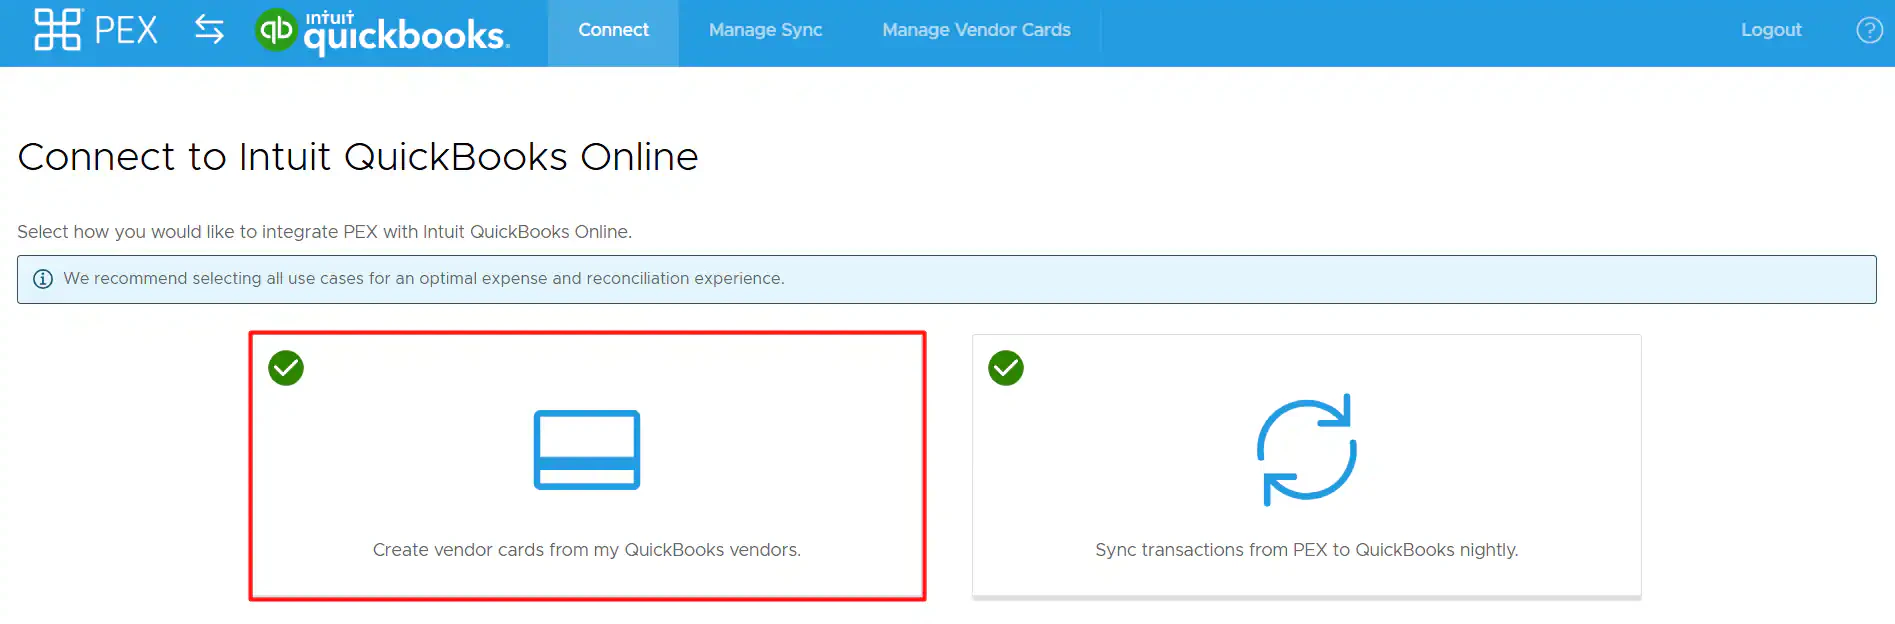
There are currently two options for how you can connect PEX with QuickBooks Online. We recommend as many as possible to make your reconciliation experience seamless.
* Create vendor cards from my QuickBooks vendors.
* Sync transactions from PEX to QuickBooks nightly.
Click **Create vendor cards from my QuickBooks vendors** to open the **Sync vendors to PEX** wizard.
Click the green button to connect to your QuickBooks Online account if you are not already connected.
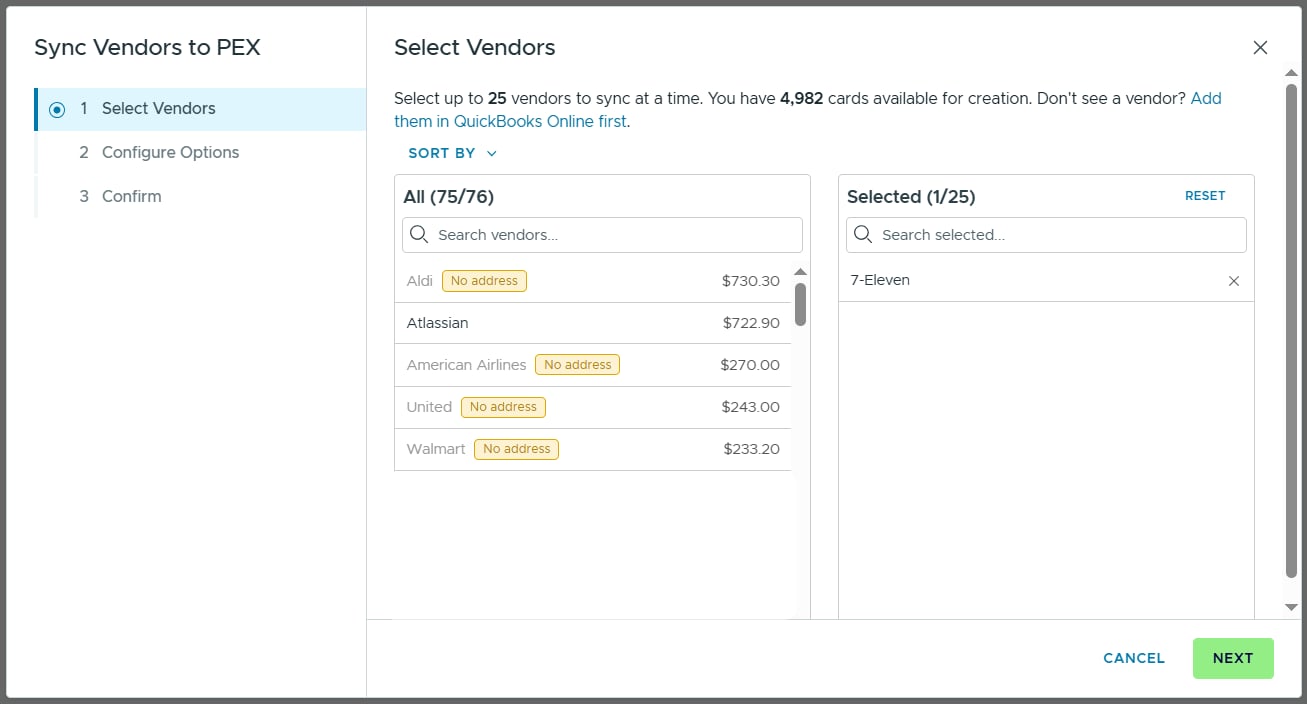
The wizard has three steps: **Select vendors**, **Configure options** and **Confirm**.
## Step 1 — Select vendors
You will see a dual-panel picker: your QuickBooks vendors on the left under **All** and your picks on the right under **Selected**. Each row shows the vendor name and its QuickBooks spend so you have context while you choose.
**Note:**
PEX imports only **active** vendors.
Sort the list **A to Z**, **Z to A** or by **spend**, and use the search box to filter by vendor name.
Click a vendor row to select it. Selected vendors move to the **Selected** panel.
**Note:**
You can sync up to **25** vendors at a time.
A vendor with no address in QuickBooks shows a **No address** label and is grayed out so you cannot select it. Hover over the row and you will see: *Address is required. Add an address in QuickBooks and refresh this page.* Add the address in QuickBooks Online, then refresh the wizard.
If a vendor is missing from the list, add them in QuickBooks Online first. See [Add a vendor in QuickBooks Online](https://quickbooks.intuit.com/learn-support/en-us/help-article/vendor-management/add-vendor-quickbooks-online/L29cgm4Ag_US_en_US?uid=ld34zhpc). After you add them, the name is searchable in PEX.
To start over, click **Reset**. It appears once you select at least one vendor.
Click **Next**. If you have not selected a vendor, PEX shows *Select at least one vendor*.
## Step 2 — Configure options
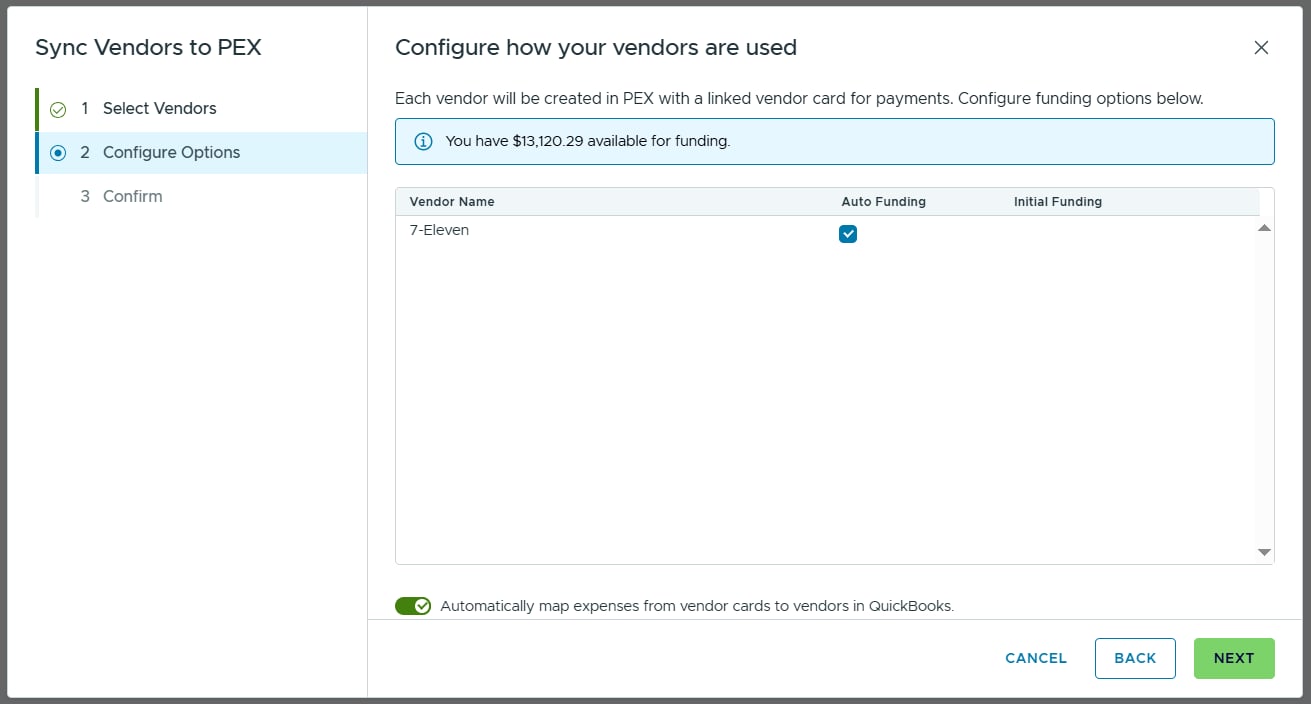
On the **Configure how your vendors are used** screen you will see every vendor you selected. Each vendor is created in PEX with a linked vendor card for payments, so here you set the funding for those cards. An info banner shows how much you have available for funding.
Set funding per vendor:
* **Prepaid**: turn on **Auto Funding** to fund the card from your PEX Business Balance, or add an **Initial Funding** amount for that vendor card.
* **Credit**: set the **Card Limit** for each vendor card.
Use the **Automatically map expenses from vendor cards to vendors in QuickBooks** toggle at the bottom. It is **on** by default.
When the toggle is **on**, spending on each vendor's card maps back to the matching QuickBooks vendor for reporting. When it is **off**, PEX books all your PEX purchases against a single vendor.
Click **Next**.
## Step 3 — Confirm
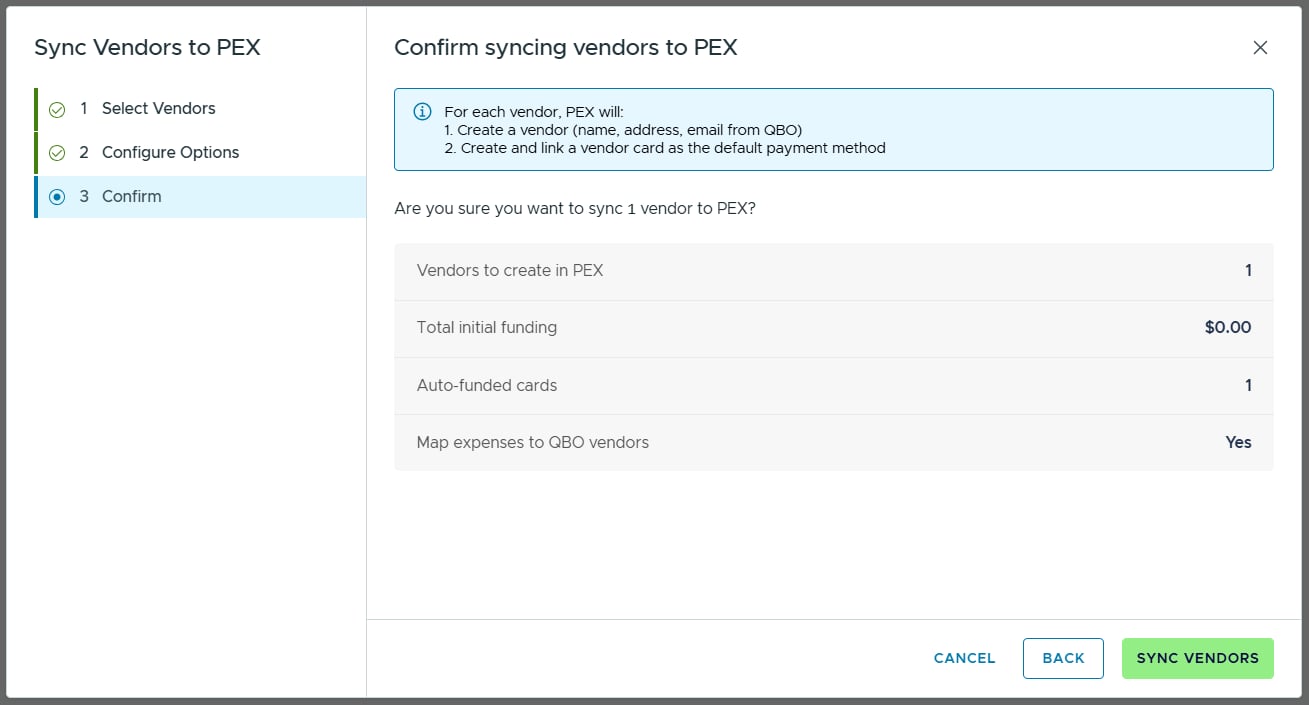
On the **Confirm syncing vendors to PEX** screen, a banner reminds you what happens for each vendor. PEX will:
1. Create a vendor with the name, address and email from QuickBooks.
2. Create and link a vendor card as the default payment method.
Review the summary table, then click **Sync vendors** to confirm. Use **Back** to change funding options or **Cancel** to close the wizard.
**Note:**
Before creating a vendor, PEX checks whether that QuickBooks vendor already exists in PEX (by QuickBooks vendor ID first, then by name). If it already exists, PEX skips it so you never get a duplicate. This is why the wizard works cleanly alongside bill sync: vendors you sync here are recognized when unpaid bills sync in.
If a vendor name in QuickBooks is longer than 15 characters, the vendor card name in PEX is truncated to 15 characters. The vendor record keeps the full name.
## Managing vendors
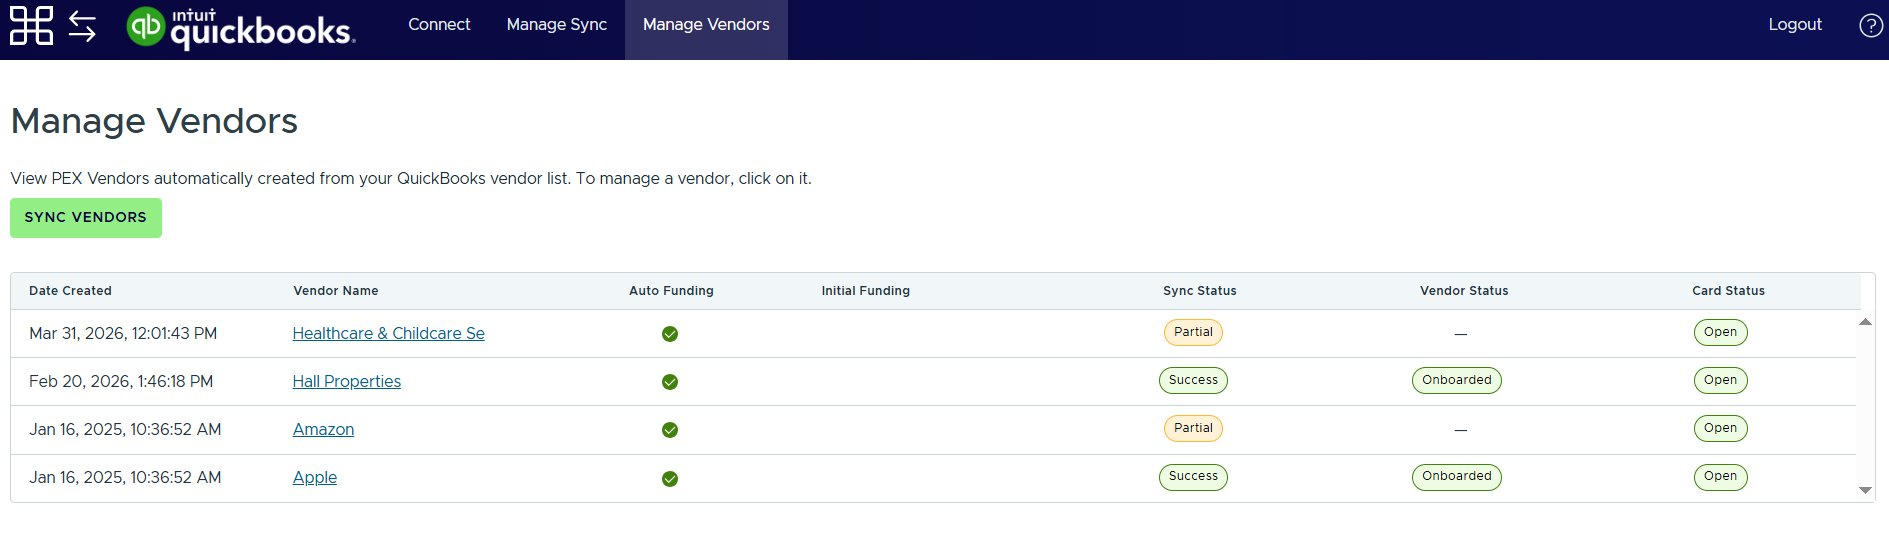
After you sync, PEX opens the **Manage vendors** tab, where you can view the PEX vendors created from your QuickBooks vendor list. All vendor cards are **activated** on creation and can be used immediately.
Click a vendor name to open the vendor detail page in your Dashboard's **Vendors** section.
The table shows the sync and status of each vendor:
* **Prepaid**: Date Created, Vendor Name, Auto Funding, Initial Funding, Sync Status, Vendor Status (Draft, Pending, Onboarded, Closed) and Card Status (Open, Closed).
* **Credit**: Date Created, Vendor Name, Card Limit, Sync Status, Vendor Status (Draft, Pending, Onboarded, Closed) and Card Status (Open, Closed).
If you have not synced any vendors yet, you will see *No vendors synced yet. Click SYNC VENDORS to get started.*
For connector questions, email [quickbooks@pexcard.com](mailto:appsupport+quickbooksonline@pexcard.com)
## Related topics
- [PEX Connector for QuickBooks Online (Credit)](/administrator-guide/pex-connector-for-quickbooks-online-charge.md)
- [PEX Connector for QuickBooks Online (Prepaid)](/administrator-guide/pex-connector-for-quickbooks-online-prepaid.md)
- [Create PEX tags for QuickBooks Online](/administrator-guide/create-pex-tags-for-quickbooks-online.md)
- [PEX Connector for QuickBooks Desktop](/administrator-guide/pex-connector-for-quickbooks-desktop.md)
- [PEX Connector for QuickBooks Desktop (Prepaid)](/administrator-guide/pex-connector-for-quickbooks-desktop-prepaid.md)